Have you ever opened a cookbook, found a recipe, and thought "WOW! There are WAY too many ingredients for me to do this right now!" ? I have. Some of my favorite meals require 10 or more spices to be measured and combined just to make something as simple as a roast dinner. Since I love making those meals often, though, I decided to premix all my spices for recipes that I frequently use so I wouldn't have to measure each time. It makes cooking a snap!

Where to keep these spice mixes? We received a spice rack for our wedding with little glass jars. After 5 years of not using half of them (sorry, I just don't use whole coriander all that often), I emptied the ones I didn't use and relabeled all of them for the spices I use the most. I reserved a few for my spice mixes, so I just mix all the spices in a bowl and pour them (using a funnel) into the jars. Wa-la!

I'll share three spice mixes that make great meals, but first let me tell you about a few others that are simple and practical.
First, make a salt and pepper mix. Have you noticed how many recipes call for salt and pepper to taste? Well, instead of grabbing two shakers, just grab one. I do my ratio 3:1, three parts salt to one part pepper. I do that because my husband likes pepper a lot. If it were up to him, it would be 2:1. But we compromised.
Second, it is great having cinnamon sugar already mixed and ready to go. My kids love it on toast or bagels, and it's always right there. I do my mixture in a 4:1 ratio, sugar to cinnamon. So one cup of sugar to 1/4 cup cinnamon. Of course, adjust to your own tastes.
Third, I really love my Italian Spice Mix. This is great to add to homemade pizza sauce, or even into my pizza dough. Mmm...It is also great when I make pasta primavera with an olive oil sauce. A few shakes of this mix and I have a yummy dinner all done. For this, you can use your favorite Italian spices, but what I use is basil, oregano, and garlic salt. I use about 4:1:2, because I really love basil and garlic.
Now for my meal mixes. The first is for a Rotisserie Chicken. With barbecue season coming up, I'm sure we'll be firing up our rotisserie on our barbeque a few times to make this. However, it is also good in the oven or in the CrockPot.
3 Tbs salt
2 Tbs paprika
1 Tbs onion powder
1 Tbs thyme
1 Tbs pepper
1/2 Tbs cayenne pepper
1/2 Tbs garlic salt
Combine the ingredients and store. When you are ready to use it, sprinkle generously all over the chicken and rub it in. Bake as you would a whole chicken or cook on a rotisserie for a really awesome meal.
Next is for Chicken Chimichangas. This recipe is SO good and is wonderful for chimichangas. However, the same spice mix can be used any time you're making chicken for tacos or burritos. It is SO yummy!
2 Tbs chili powder
1 Tbs crushed dried red pepper
1 Tbs garlic powder
1 Tbs oregano
1 Tbs cumin
1/4 cup dried onion
To use for Chimichangas, cook 4 chicken breasts in about 1/4 cup of the mix plus 1/2 cup water. Shred chicken. Mix in 1 cup shredded cheddar cheese. Roll into tortillas and lightly fry in 2 Tbs olive oil. I do this in my CrockPot for an even easier meal. Just make sure to add the cheese at the end, like the recipe says, not at the beginning!
Or just sprinkle some into chicken for your other Mexican meals. It is delicious. The best Mexican chicken seasoning I've had.
What about for beef? Use this Taco Seasoning Mix in place of the store bought packets. It's a little spicy, so adjust the chili powder and cumin to your family's tastes.
¼ cup dried minced onion
3 Tbs chili powder
2 Tbs ground cumin
2 Tbs salt
1 Tbs crushed hot red pepper flakes
1 Tbs dried minced garlic
1 Tbs cornstarch
2 tsp oregano, crushed well
Mix ingredients well. Store in a jar. ¼ cup seasoning mix = 1 packet.
And finally, my signiature dish-Shredded Pot Roast. I created this spice mix when I was first married by opening all the spice jars in my spice rack and smelling them. If it smelled like meat, I used it. Over the last few years, I've modified it a little, but for the most part, it's the same as when I started.
3 Tbs seasoned salt
1 Tbs parsley
1 Tbs pepper
1 Tbs salt
1 Tbs garlic salt
1 Tbs paprika
½ Tbs chili powder
1 tsp basil
3 Tbs dried minced onion (sometimes I use half as much onion powder instead)
Mix together ingredients. My favorite cut of meat is a Cross Rib Roast because it is the most tender, the list grisley, and does the best in a CrockPot. However, that cut is seemingly unavailable here, so I've been using a bottom round chuck roast lately and it is fine. Just not as good as what we love. Sprinkle and rub seasonings over entire roast. Work in seasonings as much as you can. Meanwhile, heat oil in a large skillet over medium-high heat. When oil is hot, place roast in skillet. Use tongs or forks to rotate roast to brown all sides. Brown really well. Remove from skillet and place roast in Crockpot. Scrape any remaining seasonings from skillet into CrockPot. Combine 1/2-3/4 cup water and any remaining seasonings (I usually sprinkle a little more into the water) and pour over roast. Cover and cook on low 7-10 hours. Shred meat and serve. To add veggies to roast, chop potatoes and carrots and add to pot about 2-3 hours before serving. Turn temperature to high and cook until the veggies are tender and the meat falls apart.
Now here's some truly wonderful news: this is the same spice mix I use for my amazing Beef Stew! If Shredded Pot Roast is my signiature dish, then this is my John Hancock. Oh, man, I'm craving it already! All you do is toss a couple Tbs of this mix with 1/2 cup of flour, toss that with cut up cubes of roast, then brown them in a little oil in a large skillet. Add to a CrockPot filled with potatoes, carrots, celery, and onion. Then add enough beef broth and water to cover.

Add a few more sprinkles of the mix, cover, and cook on low 5-7 hours. About 20 minutes before serving, mix together about 1/4 cup flour with 1/2 cup water. Pour through strainer into stew and stir to thicken. Add more seasoning mix if you feel it doesn't have enough flavor for your tastes. I often add more garlic salt, since I really like that. You won't be disappointed!

I hope these make your cooking endeavors even easier! Look through your cookbooks to find what other recipes you can mix ahead of time to save you time at the dinner hour!
If you liked this post, you might also like:
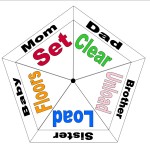 Chore Wheels
When we were growing up, our mom had a chore chart taped to the inside of the cupboard door. Our typical daily chores were: Set the table, Clear the table, Unload the dishwasher, Load the dishwasher, Sweep the floor. Our typical weekly chores were: Kitchen... S’mores Dessert Pizza
I love s'mores. I love pizza. I love s'mores pizza. Ever had it before? If not, don't worry! Just because summer is ending doesn't mean the great foods of summer need to wait until next year.
I have a GREAT recipe that is so simple, you can have it tonigh... Finally....My Perfect Birth
Eleven years ago, I found out I was expecting our first child. Suddenly, I found myself planning my first birth. What did I want in my labor experience? What were my beliefs? What were my dreams?
In nursing school, I had seriously considered extending m...

 The Miracle of the Leaky Pipe
 Apple Season + Autumn = Caramel Apples!
 Free Museum Day!