A lei in definition is a garland or a wreath that is meant to be worn. Lei is usually given for events such as concerts, graduations, birthdays, anniversaries, or for speakers at events. Traditionally it is a symbol of aloha. In Hawaii, a lei is given with a kiss on the cheek and culturally a lei is like a hug worn around the neck. A lei finds its roots in Hawaii, and has surprisingly stayed put in the islands, except for the occasional luau party elsewhere, where usually a string of shredded plastic is the typical lei.
I have often wondered why that is. Hawaiian flowered shirts, or aloha shirts, as they are called, are found outside the islands, and so are pina coladas. “Locals” sandals (or “slippers”) are also the fad an ocean away from O’ahu, but the lei seems to have remained where it began. Of course, one reason could be that Hawaii is blessed with beautiful flowers budding from seemingly every tree, and I must admit, I have not created a lei from mainland foliage before, but the process of creating lei should be the same wherever you may reside, and the tender unspoken language that a lei extends from the giver to the receiver can still be as meaningful whatever the occasion and wherever the location.
There are several different types of lei, from candy lei to yarn lei to ti leaf twisted lei. Ideally, a lei given to someone is homemade, and intricate ones can take the majority of a day’s work to create. They don’t have to take that long, however, and the best part of it all is it is fun for kids to do. They can be involved every step of the way and it allows their creative juices to flow. It also swells their love for nature. Depending on their age, they can create one on their own or it can be a fun parent-child activity. The adage, “anything goes” really does apply to lei making. Use what you have and in whatever order you can think up. As long as it is done in the spirit of love, it’s a lei.
At the beginning of this month my friend asked me if my girls could be her flower girls for her wedding on a river atop stand up paddle boards (wow — cool.) We were honored to do so, and I knew haku (lei worn around the head) were in order. Here’s a description of what I did and how you too can create a lei wherever you may be:
What you will need:
Plenty of foliage
Durable “button hole” string, about 6 inches longer than the length of your desired lei
needle
Step #1: Pick the foilage
Having 2 haku (head lei) to create, I rode my bike around town striping all trees and bushes of their flowers. You want a lot more flowers than you think you would need. For one neck lei, count on one grocery bag full of flowers. And then if you happen to have extra, you can make a beautiful centerpiece of flowers floating on a dish of water.
The type of flower you pick is important. Look for the more durable flowers, and typically the larger flowers, or ones with sturdy stems. Almost any flower will do, but if you find the flower you are picking loses its petals easily or the petals get damaged easily, or dies too quickly, skip it.
You want to pick the flower at the base of its stem to make sure the stamen stays in place.
A lei can be accentuated by green leaves, or strung only with leaves, so be sure to include those too!
Step #2: Separate the flowers
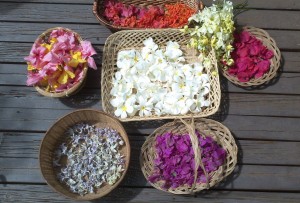
You will simplify the process if you can visually see the amount of flowers you have of each type and the various colors you have collected.

The variety of flowers used for my lei. The pink and yellow hibiscus on the right proved to be too flimsy and big for the lei, so it was not used.
Step #3: String the foliage
After passing the string through the eye of the needle, tie a tight double knot at the base of the needle. You want it to be strong enough to withstand the tug of passing through the flowers while maintaining a slim enough knot that will not tear the flowers.
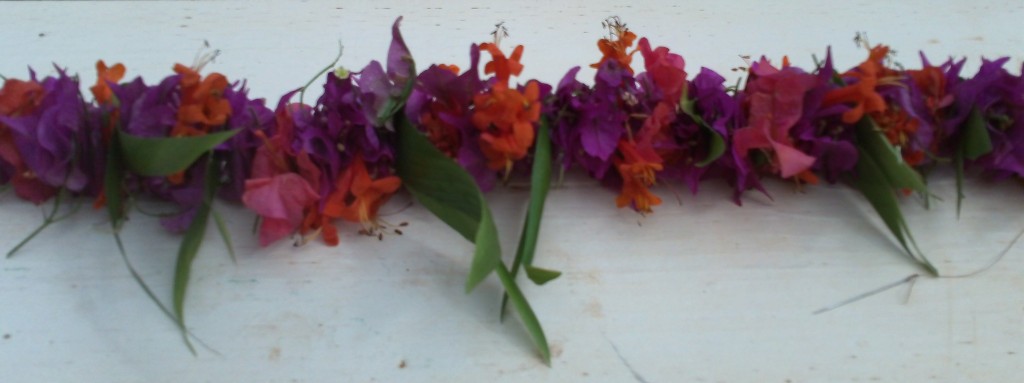
There are two ways of stringing the flowers. One is to poke the needle through the stem of the flowers. You can allow the flowers to all point the same direction or give some dimension to the lei by turning the flowers so they point toward different directions. Some flowers don’t have much of a stem, like the bouganvilia, a paper-like flower. These are better off being strung through the petals themselves.

Bougainvillia and orange cigar flowers with ti leaf accents. Flowers are strung through the stem or petals
The other method is to string the flower through the stem and up through the middle of the flower where the stymen is (if it has one).
It is recommended that a leaf or two follows a row of flowers. I cut ti leaves at an angle and at about 6 inches long. I then folded them in half with each side slightly off center, then strung the string through the point where both halves met.
As you string the lei, slide the flowers down the string to be sure they don’t bunch up and become damaged. Allow about 4 inches at the end for easy tying.
Be sure to model it in the mirror before you have strung too many flowers; what may look pretty strung in front of you may be a different story when strung around someone’s neck or head. I found that out as I created a haku lei solely of plumeria — way too poofy.
So, what do you do if you make a mistake? Simply break off the flower or leaf.
Measure when you are done and tie the two ends together and wha-la! You’ve made yourself a lei. 😉

On our flower girl stand up board -- I paddled while the girls threw flowers into the river from their baskets


Thanks for good stuff