We were going “backyard camping” this last weekend. We had the tent set up in the side yard, hotdogs in the fridge, and marshmallows and chocolate in the cupboard. All we were missing were the graham crackers! A friend had suggested one time to make homemade graham crackers, and now I not only had the desire, but also the reason to make them.
I was looking for the equivalent to Nabisco’s Honey Graham Crackers; no other store bought graham crackers have that same distinct “can’t-put-my-finger-on-it” “graham cracker taste.

Nabisco Honey Graham Crackers - my competition for this baking endeavor
Was it possible I could actually make it in my own kitchen?
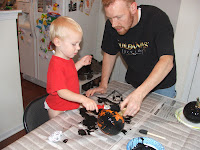
Well, I found this recipe online and absolutely loved it. It is from the blog smittenkitchen.com, which is written by someone who spends much more time in one day in the kitchen than I do in one year, who in turn had gotten it from Nancy Silverton’s Pastries from the La Brea Bakery. What’s even better is this recipe is so fun to make with small “helping” hands, from mixing the ingredients to rolling the dough to decorating to cutting, and of course, to eating 😉
Homemade Graham Crackers
Makes 10 4 x 4.5-inch graham crackers or 48 2-inch squares
2 1/2 cups plus 2 tablespoons (375 grams) unbleached all-purpose flour (a swap of 1/2 cup with whole wheat flour or 1 cup whole wheat pastry flour works well here, too)
1 cup (176 grams) dark brown sugar, lightly packed
1 teaspoon (6 grams) baking soda
3/4 teaspoon kosher or coarse sea salt (4 grams)
7 tablespoons (3 1/2 ounces or 100 grams) unsalted butter, cut into 1-inch cubes and frozen
1/3 cup (114 grams) mild-flavored honey, such as clover
5 tablespoons (77 grams) milk, full-fat is best
2 tablespoons (27 grams) pure vanilla extract

All the ingredients are pretty basic and probably won't necessitate a trip to the store
Topping (optional)
3 tablespoons (43 grams) granulated sugar
1 teaspoon (5 grams) ground cinnamon
Make the dough: Combine the flour, brown sugar, baking soda, and salt in the bowl of a food processor fitted with the steel blade or in the bowl of an electric mixer fitted with the paddle attachment. Pulse or mix on low to incorporate. Add the butter and pulse on and off on and off, or mix on low, until the mixture is the consistency of a coarse meal.
[I happened to have neither an electric mixer or a food processor. I used my {clean} hands to mix and it worked great — and that’s a way to have the kids get “into” the baking process!]
In a small bowl, whisk together the honey, milk, and vanilla extract. Add to the flour mixture and pulse on and off a few times or mix on low until the dough barely comes together. It will be very soft and sticky. Lay out a large piece of plastic wrap and dust it lightly with flour, then turn the dough out onto it and pat it into a rectangle about 1-inch thick. Wrap it, then chill it until firm, about 2 hours or overnight. Meanwhile, prepare the topping, if using, by combining the sugar and cinnamon in a small bowl and setting aside.

No eggs in the batter, so it's safe to eat (and really good too!)
Roll out the crackers: Divide the dough in half and return one half to the refrigerator. Sift an even layer of flour onto the work surface and roll the dough into a long rectangle about 1/8 inch thick. The dough will be sticky, so flour as necessary. Trim the edges of the rectangle to 4 inches wide. Working with the shorter side of the rectangle parallel to the work surface, cut the strip every 4 1/2 inches to make 4 crackers. [I used a pizza cutter, and love the design of this one that’s kid- friendly]

A fun way to involve the kids -- here are my daughters patting down the dough into a rectangle.
Place the crackers on one or two parchment-lined baking sheets and sprinkle with the topping. [I couldn’t find my parchment paper so I sprayed the tray with oil and sprinkled with flour, which worked like a gem.]
Chill until firm, about 30 to 45 minutes in the fridge or 15 to 20 minutes in the freezer. Repeat with the second batch of dough. Finally, gather any scraps together into a ball, chill until firm, and re-roll.
Adjust the oven rack to the upper and lower positions and preheat the oven to 350°F.
Decorate the crackers [because who wants to eat a graham cracker that looks nothing like a Nabisco Honey Graham Cracker?]: Mark a vertical line down the middle of each cracker, being careful not to cut through the dough (again, this is for the traditional cracker shape).

I marked the beginning and ending of the lines to make it easier for my daughter to cut well, slightly straight lines
Using a toothpick or skewer, prick the dough to form two dotted rows about 1/2 inch for each side of the dividing line. [My girls used the small end of a chopstick, and made dots wherever they darn well pleased.]

poking holes into the crackers
Bake for 25 minutes, until browned and slightly firm to the touch, rotating the sheets halfway through to ensure even baking. [My crackers were done in 18 minutes… you’ll probably be better off checking them every once in a while to be sure they don’t burn!]
We tasted them after they were out of the oven. The had the same crunch and the mouth watering taste of those Nabisco graham crackers, only these were a bit more, well, real, and tasted even better!
The next day we headed down to Kahana Bay, a beautiful secluded bay on the windward side of the island and sparked a small fire in a bar-b-cue to roast marshmallows.

We even made a coconut husk reflector oven for to make these marshmallows roast just right
One bite of these delectible treats on the homemade graham crackers proved this recipe’s a keeper.

Mmm-mmm!
One thing I did notice was that the crackers lost their crunchiness by day 2. I just tried re-baking them for another 13 minutes at 350 degrees to see if it brought the crunchiness back, and it turned it into a delicious chewy cookie with a crunchy cracker crust – yum!
If you liked this post, you might also like:
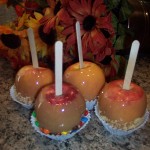 Apple Season + Autumn = Caramel Apples!
Growing up, every autumn our school would send around order forms for caramel apples. We called them taffy apples. I LOVED them and lived for them. My favorites were the ones with peanuts covering the apple. Mmmm...delicious. I never really made my ... A Binder for Boredom -- and a Magazine for Mom
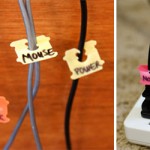
There are some things I would recommend to all parents, and this is one of them, especially if you have children between the ages 2 to 13.
It is FamilyFun magazine. Wait! If you're thinking, "I am not a magazine person -- no thanks", read on! The...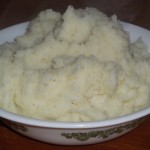 Healthier AND Easier Mashed Potatoes--No Butter, Milk, Sour Cream, Cream Cheese
My husband's grandfather was raised in France and had a very ecclectic flair about him. One thing he loved to do was to make and eat good food. My sister in law will never forget the day she was making dinner and her grandfather came over, tasted the dish,...


 I’ve used The Works, Scrubbimg Bubbles, and even Baking Soda in my tub, and today I grabbed this old staple, and it worked GREAT!
 The BEST shower grout cleaner I have ever used. I just applied it, let it sit, wiped it, then rinsed.
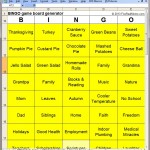 Free "Do-it-yourself" Bingo Generator Program
 Life More Organized–New Year’s Resolution
 Fabulous Family Fun