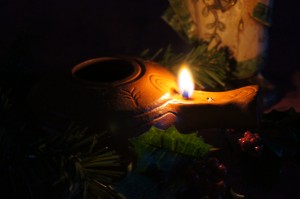
A tradition our family has at Christmas is to light an oil lamp, with olive oil in it, similar to what we imagine they would have had in Christ’s time. We put it on our table for our Christmas Eve meal and talk about what it might have been like the night Christ was born.
If you like short posts, you can stop here. If you’d like more info., including our trial and error experiences, read on.
When the wick that came with our lamp ran out, I had a hard time replacing it with something that would keep lit. I learned online that I needed 100% cotton, but what I thought was 100% cotton string or T-shirt scrap didn’t work for more than a minute or two. For a couple of years our tradition was pretty pitiful. Finally I tried making one out of a cotton ball, and it worked great! And cheap and handy, too. (And pretty obvious, in hindsight, of course.)
Just take a cotton ball and gently pull out the cotton.
Spin it between your fingers to make a strand. If you make it too thin, it may not draw the oil up efficiently enough to stay lit. Try again. You also want it long enough to have an inch or 4 lying in the oil inside the lamp so it will last a while.
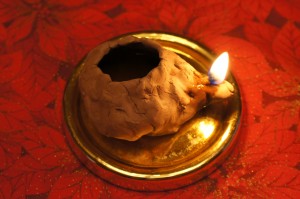
Recently, we attended a Christmas party with a “Back to Bethlehem” theme, and there they made their own clay oil lamps! Very cool. They used air drying clay for convenience, and the lamps still work. We did learn some lamp making tips I thought I’d pass on:
1. Use a bowl shape. Do not have a large flat area on the bottom. If you do, you will have to fill it with a lot of oil for the wick to get at it.
Or you can tip it to one side.
2. Keep the hole small enough to hold the wick up.
Or use a paper clip to make the hole smaller. This is only an issue, though, if your lamp design violates #3, as you can see by the many examples of lamps you can buy here.
3. The hole’s location shouldn’t make the wick dangle too far before resting on the side of the bowl.
Or you can use the rest of the paper clip to help hold up the oil-saturated wick.
Most of all, learn from your mistakes. Else, why make them in the first place?
This second try my daughter made worked so much better than her first homemade try!
Here are some other helpful tips we have learned using our oil lamps.
Some of the wick they had at the party didn’t work for us at all, but another kind worked great! Sadly, they don’t know where they got the wick that worked. Good thing we have our cotton ball trick. (You can probably buy it online without too much difficulty, I just figured I could find 100% cotton without have to buy something.)
The pottery is porous, and absorbs the oil. Our purchased lamp that we have used for years is saturated and a little sticky. I have it on a little non-porous plate. Our new home-made lamps have also absorbed the oil and have eventually soaked through onto the plate or perhaps leaked, so I wouldn’t use them on another surface unawares.
From what I’ve seen, with a good wick, your lamp will burn with no maintenance until you blow it out or it runs out of oil. The next time you light it, trim your lamp by pinching off the wick that has turned to ash, pull the wick out a fraction of an inch, and relight it. Your wick will last a long time.
I’ve even used our lamp instead of emergency candles when our power has gone out. I’ve heard that olive oil lamps are safer than other lamps because if it should spill, it will just go out as it is not as flammable as other fuels.
Here’s a link to someone who made oil lamps using Sculpey clay.
And in case you are wondering, you can just use any olive oil you find at the store.


